

Ceiling drywall crack repair lasts best when you fix the cause first, then reinforce the crack with joint compound and tape instead of just smearing filler over the line. If the ceiling is dry, flat, and stable, many cracks are homeowner-fixable. If it is stained, soft, sagging, or keeps reopening, stop and check for a leak or movement problem before you patch.
A lot of ceiling cracks are cosmetic. Some are just old taped seams showing through paint. But some cracks are warning signs that the drywall is moving, the ceiling got wet, or the original repair was too weak. The goal is not just to hide the line. It is to make the repair last.
Quick Checks First
For a typical non-structural ceiling drywall crack, the most reliable repair is:
- make sure the area is dry and stable
- open and clean the crack slightly
- apply joint compound
- embed paper tape
- add two or more thin finish coats
- sand lightly
- prime and repaint
For cracks larger than a true hairline, taped repair is the better long-term method. The USG/CGC Finishing Drywall Systems handbook says surface cracks larger than hairline should be treated with joint compound and tape. If the crack has a stain, soft drywall, bubbling paint, sagging, or repeated reopening, fix the moisture or movement issue first.
Before You Start: Know What Kind of Crack You Have
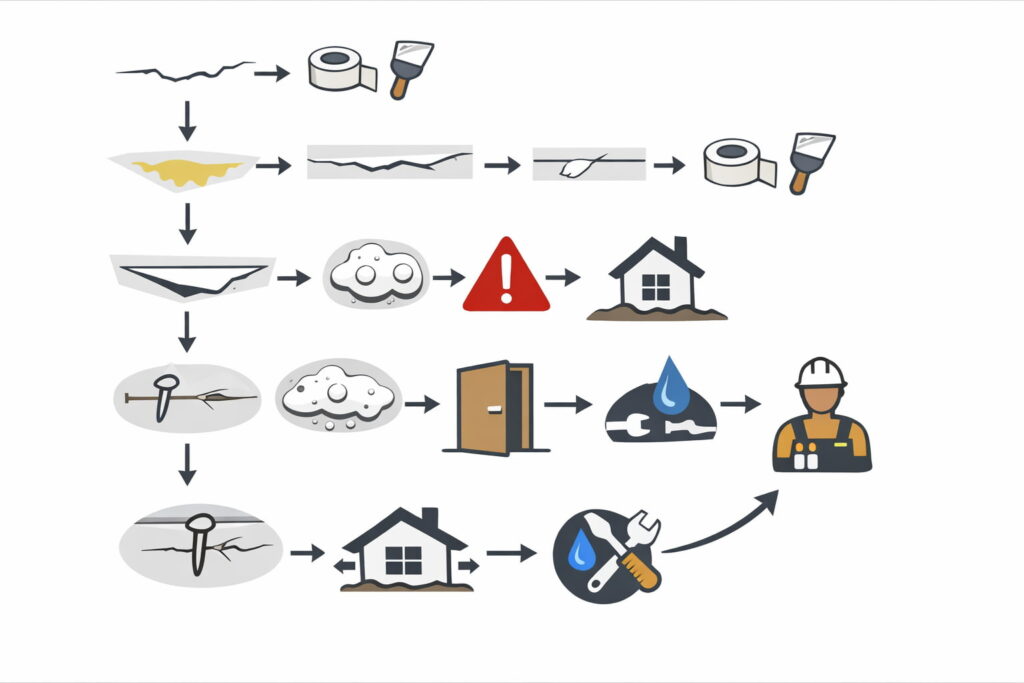
A ceiling crack is usually one of these:
Hairline cosmetic crack
This is a very thin line with no stain, no sagging, and no height difference from one side to the other. It is often caused by normal settling, seasonal movement, or an old joint telegraphing through paint.
Joint or tape failure
This often shows up as a straighter crack, usually along a seam. It may have been patched before with filler only, then reopened.
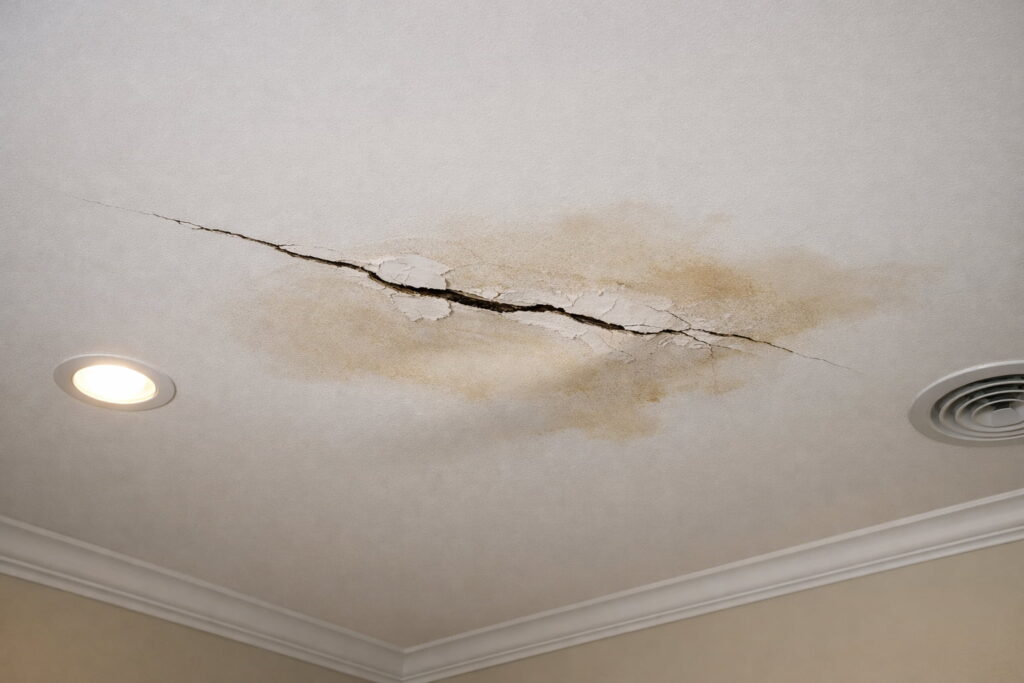
Moisture-related or movement-related crack
This is the one to take more seriously. Watch for:
- yellow or brown stains
- bubbling paint
- soft drywall
- a musty smell
- sagging
- a widening gap
- one side sitting higher than the other
- repeated cracking in the same place
If you see those signs, do not treat it like a simple cosmetic patch. The EPA mold and moisture guide says the key to mold control is moisture control, and water-damaged materials should be dried promptly after the water problem is fixed.
When You Can DIY and When You Should Stop
Usually okay for a careful DIY repair
You can usually repair it yourself when:
- the crack is narrow
- the ceiling is flat
- the drywall feels dry and solid
- there is no active leak
- there is no sagging
- the crack is limited to drywall finish, not obvious structure movement
Stop and call a pro if you notice any of these
Do not keep patching if you see:
- sagging ceiling drywall
- a widening gap
- one side of the crack offset from the other
- repeated reopening after a proper taped repair
- fresh water staining or damp drywall
- mold growth or a musty smell
- several new cracks showing up at once
- nearby doors or windows suddenly sticking
If immediate life-safety risk is present, stop work, keep people out from under the damaged area, and contact a qualified pro right away.
Safety First Before You Touch the Ceiling
Before you start ceiling drywall crack repair:
- wear eye protection
- use a dust mask or respirator suitable for dust
- protect floors and furniture
- use a stable ladder on a flat surface
- keep the work area dry
- keep kids and pets away
- avoid overreaching overhead
If the home was built before 1978, be especially careful. The EPA Lead-Safe Renovations for DIYers page warns that disturbing painted surfaces in older homes can create dangerous lead dust. That is a good point to slow down, use lead-safe practices, or hire a lead-safe certified contractor.
If the crack is tied to a leak, fix the water source first. Do not patch over damp drywall and hope for the best.
Tools and Materials for a Durable Repair
For most homeowner-safe repairs, gather:
- utility knife
- 4-inch drywall knife
- 10-inch or 12-inch drywall knife
- sanding sponge or fine drywall sandpaper
- vacuum and drop cloths
- paper drywall tape
- joint compound
- drywall primer
- matching ceiling paint
For a crack that reopened before, or one that is wider than a simple paint-line crack, a setting-type joint compound is usually the better first coat. The USG Plastering Technical Guide: Repair and Resurfacing Systems describes using setting-type compound with paper tape for wider or deeper crack repairs.
How to Repair a Ceiling Drywall Crack Safely
Step 1: Confirm the ceiling is dry and stable
Look closely before you patch. Check for:
- stains
- soft spots
- peeling paint
- bubbling
- musty odor
- sagging
- visible movement around the crack
If you find moisture, stop and deal with that first. Patching over leak damage usually fails.
Step 2: Remove loose material
Use a utility knife to lightly open the crack and scrape away loose paint, loose compound, or loose tape. Do not gouge the ceiling deeply. You only want a clean channel and solid edges so the new material can bond.
If an old patch is flaking, remove everything loose before you continue.
If you find old drywall tape lifting away from the ceiling, cut out the loose section rather than burying it under new compound. New mud over loose tape usually fails because the base underneath is no longer bonded.
Step 3: Clean the area
Vacuum or wipe away dust. A dusty repair does not bond well.
In older homes with painted ceilings, avoid spreading dust through the room. Use careful containment and cleanup methods.
Step 4: Apply the first coat of compound
For a small crack, apply a thin first coat into the opened line.
For a wider, deeper, or previously reopened crack, use setting-type compound for the first fill layer. Press it into the crack so it fills well and creates a good base for tape.
Step 5: Embed paper tape
Press paper drywall tape over the crack and smooth it with your knife so it lies flat with enough compound underneath to bond.
This is where many failed repairs go wrong. A quick skim over the line may hide it for a while, but tape is what helps reinforce the repair and reduce the chance of the crack returning.
Step 6: Let it dry or set fully
Do not rush the next coat.
Setting-type compound hardens chemically. Ready-mixed compound dries by evaporation. Either way, wait until the first coat is firm and dry before moving on.
Step 7: Add two or more thin finish coats
Apply a second coat wider than the first. Then apply a third coat wider than the second if needed. Feather the edges so the patch blends into the rest of the ceiling.
Several thin coats almost always look better than one thick coat.
Step 8: Sand lightly
Sand just enough to smooth ridges and edges. Heavy sanding makes more dust and can damage the tape.
A sanding sponge is usually easier to control overhead than loose sandpaper.
Step 9: Prime the patch
Do not skip primer. Fresh compound can flash through paint and leave a dull, obvious patch if you paint directly over it.
Prime first, then repaint the ceiling.
If your ceiling has texture, the repair may still show unless you match that texture before final paint. Smooth ceilings usually need careful feathering and priming, while textured ceilings often need a separate texture touch-up step after the patch is dry and smooth.
Video: main repair method
This video helps readers visualize a homeowner-friendly ceiling crack repair method that closely matches the step-by-step flow.
What Works Best for Different Crack Types
Hairline crack in a flat, dry ceiling
You may get away with a modest compound repair if it is truly tiny. But once the crack is more than a fine paint-line, tape is the smarter long-term fix.
Straight crack along a seam
Treat this like a joint repair, not a paint issue. Clean it out, apply compound, and tape it.
Crack that already came back once
Use the more durable method:
- open the crack
- use setting-type compound for the first coat
- embed paper tape
- finish with wider coats
- prime and paint
If it comes back again after that, the problem may be movement, not the patch itself.
Crack with stain, bubbling, or softness
Do not patch yet. Find and fix the leak first. Dry the area fully. Then repair the drywall finish.
Common Mistakes That Make Ceiling Cracks Reopen
1. Smearing filler over the line
This is the most common shortcut. It often looks fine at first, then the crack comes back.
2. Skipping tape
For anything beyond a tiny paint-line crack, tape gives the repair better reinforcement.
3. Patching over damp drywall
If moisture caused the crack, the patch usually fails.
4. Using thick coats
Thick coats shrink more, take longer to dry, and are harder to blend.
5. Painting without primer
The patch may flash or stand out.
6. Ignoring the cause
If the ceiling is moving, leaking, or sagging, the patch is not the whole fix.
A Quick Homeowner-Safe Troubleshooting Flow
Symptom: Thin crack, no stain, no sagging
Likely issue: cosmetic finish crack
Safe next step: repair with compound, and use tape if it is more than a true hairline
Symptom: Crack reopened after an old patch
Likely issue: failed filler-only repair or ongoing joint movement
Safe next step: open crack, use a stronger base coat, embed paper tape, and refinish with thin coats
Also look for nail pops or screw pops near the crack. If fasteners are showing and the area feels loose, the crack may be tied to movement at the panel edge rather than just a failed surface patch.
Symptom: Crack with yellow stain or bubbling paint
Likely issue: current or past leak
Safe next step: fix the water source first, dry the area fully, then repair
Symptom: Long recurring crack plus sticking doors or visible movement
Likely issue: movement beyond simple drywall finish failure
Safe next step: stop patching and get the cause checked
How to Make the Repair Blend Better
A sound repair can still look bad if it is not blended well.
For a cleaner finished look:
- feather each coat wider than the last
- sand lightly between coats if needed
- prime the full patched area
- repaint enough of the ceiling to avoid a visible spot repair
- if the ceiling has texture, match the texture before final paint
If the whole ceiling has many old hairline cracks, patching one area at a time may still leave the surface looking uneven. In that case, broader skim coating or pro refinishing may make more sense.
Ceiling Drywall Crack Repair in Older Homes
Older homes need extra caution for two reasons.
Lead-paint risk
If the painted surface may contain lead, DIY disturbance can spread dangerous dust. That can change a simple repair into a safety issue.
Movement history
Older homes often have more settling history. That does not automatically mean a structural problem, but recurring cracks deserve more caution before repeated patching.
Video: older-home safety check
This video is useful for readers in pre-1978 homes who need a quick visual on lead-paint risk before disturbing a painted ceiling surface.
When a Ceiling Crack May Point to a Bigger Building Issue
A drywall crack is a finish symptom. Sometimes the real problem is elsewhere.
Pay closer attention if the crack:
- follows a long straight run and keeps returning
- appears where framing direction changes
- shows up with sagging or ceiling deflection
- appears with several other new cracks
- shows up with sticking doors or window changes
- crosses an area that may be moving seasonally or structurally
That is when a drywall patch may only be cosmetic. The Gypsum Association control joint guidance helps explain why some recurring ceiling cracks are movement-related rather than just poor finishing.
When to Call a Pro
Call a drywall pro, contractor, or qualified building professional when:
- the ceiling is sagging
- drywall feels soft or crumbles
- you suspect a leak above the ceiling
- the crack widens quickly
- one side is offset from the other
- the crack keeps reopening after a proper taped repair
- the home may have lead paint
- you suspect structural movement
- the damaged area is large enough that falling material is a concern
If the crack is only a finish problem, a careful repair can last. If it is tied to moisture or movement, fixing the cause is what makes the repair last.
Ceiling damage deserves extra caution because gravity is working against the repair area. If drywall is bowed, softened, or looks like it may let go overhead, do not keep scraping or patching beneath it until the cause and stability are checked.
FAQs
Can I use spackle for ceiling drywall crack repair?
For a tiny cosmetic line, some homeowners do. But for anything beyond a true hairline crack, a taped joint-compound repair is the better long-term method.
What tape is best for ceiling crack repair?
Paper tape is a strong choice for a durable seam repair, especially for a crack that has reopened or runs along a joint.
Why does my ceiling crack keep coming back?
Common reasons include a filler-only patch, movement in the building, moisture that was never fixed, or a seam that was not reinforced well enough.
Should I repair a ceiling crack before or after fixing a leak?
After fixing the leak. Repairing the finish before the area is dry usually wastes time and materials.
Is a ceiling crack always structural?
No. Many are just drywall finish or tape issues. But sagging, displacement, repeated reopening, or nearby movement signs deserve professional evaluation.
How wide is too wide for a basic ceiling crack repair?
There is no single width that tells the whole story. A narrow crack may still need tape if it keeps coming back, while a wider crack with sagging, staining, or offset edges should not be treated like a simple cosmetic patch. In practice, repeated movement, soft drywall, or visible displacement matters more than width alone.
Is drywall compound dust a problem?
Yes. It can irritate your eyes, nose, throat, and lungs. Use dust control and basic protective gear, and be much more cautious in older painted homes.
Conclusion
Most ceiling drywall crack repair jobs are manageable when the ceiling is dry, stable, and only dealing with finish damage. The best long-lasting fix is usually not a quick smear of filler. It is a reinforced repair with the right compound, paper tape, thin finish coats, primer, and paint.
If the crack is stained, soft, sagging, offset, or keeps coming back, stop treating it like a simple patch. Fix the leak, rule out movement, or bring in a pro first. That is what gives you a repair that looks better and lasts longer.
Sources / References
- USG/CGC Finishing Drywall Systems
- USG Problems, Remedies and Preventive Measures
- USG Plastering Technical Guide: Repair and Resurfacing Systems
- Gypsum Association Control Joints for Fire-Resistance Rated Systems (GA-234-08)
- EPA Lead-Safe Renovations for DIYers
- EPA A Brief Guide to Mold, Moisture and Your Home