

If you need to know how to repair water damaged drywall, the safe answer is this: stop the leak first, dry the area fully, then decide whether the drywall can be patched or needs to be removed and replaced. Small, clean-water damage is often repairable. Drywall touched by floodwater, sewage, or long-term moisture usually is not.
Water damaged drywall can start as a stain and turn into bubbling paint, loose tape, soft gypsum, or moldy paper facing. The right fix is not just making the wall look better. It is stopping the moisture source, removing damaged material when needed, and rebuilding only on a dry, stable surface.
Quick Checks First
- Fix the leak before any drywall repair.
- Dry wet materials fast, ideally within 24 to 48 hours.
- Patch small areas only when the damage came from clean water and the surrounding drywall is dry and solid.
- Replace drywall that is sagging, crumbly, moldy, or contaminated by floodwater or sewage.
- Be extra careful in pre-1978 homes because cutting and sanding painted drywall can create lead dust.
Safety First Before You Start
Do not jump straight to mud, tape, and paint. Water damage can hide bigger problems behind the surface.
Stop and call a pro right away if you notice any of these:
- Ceiling drywall is sagging or looks ready to fall
- Damage came from floodwater, sewage, or storm surge
- There is visible mold over a large area or a musty smell keeps coming back
- The leak source may involve electrical wiring, roofing failure, plumbing inside a wall, or HVAC equipment
- The home was built before 1978 and the repair will disturb painted surfaces
- The drywall stayed wet longer than 24 to 48 hours and you suspect hidden mold inside the wall
The EPA mold guidance makes the core rule simple: moisture control is the key to mold control.
The CDC mold cleanup guidance also warns never to mix bleach with ammonia or other cleansers.
This FEMA and CDC video is worth including here because it clearly reinforces the floodwater, mold, and safety boundaries that change a drywall patch from DIY to pro-only.
This CDC video supports the safety-first message by explaining why mold after water damage is not just a cosmetic issue.
What Causes Water Damaged Drywall?
The most common causes are roof leaks, plumbing leaks, overflowing fixtures, condensation, ice dam damage, HVAC drain problems, and slow hidden moisture inside walls. Drywall gets weak because its paper facing and gypsum core do not handle prolonged moisture well. If the area dries quickly, the damage may stay localized. If not, the paper facing and wall cavity can support mold growth.
Can Water Damaged Drywall Be Repaired, or Does It Need Replacement?
It depends on the source of the water, how long the board stayed wet, and whether the drywall is still sound.
First Decide What Kind of Water Caused the Damage
Before you decide to patch or replace drywall, identify the water source. Clean water from a supply-line leak or a one-time overflow is very different from contaminated water from sewage, drain backups, toilet overflows involving waste, or floodwater. If the drywall was exposed to contaminated water, do not treat it as a standard patch repair. Removal and replacement is the safer path because contamination can extend beyond the visible stain or soft spot.
Usually Repairable
A localized stain or soft spot from a clean plumbing leak may be repairable when:
- The leak has been fixed
- The area has dried fully
- The drywall is not sagging
- The gypsum is not crumbling
- There is no sign of contamination from dirty water
- There is no meaningful mold growth in or behind the board
The USG Sheetrock Gypsum Panels Installation Guide supports the standard cut-out-and-patch method for water-damaged areas.
Usually Needs Replacement
Drywall usually should be removed and replaced when:
- It contacted floodwater or sewage
- It stayed wet long enough that mold is likely
- The paper facing is peeling badly or the core is soft and chalky
- The wall or ceiling has lost shape or strength
- The damage extends beyond a small patch area
The FEMA cleanup guidance says drywall and insulation that contacted floodwaters should be removed. The Gypsum Association guidance is also clear that sewage- or flood-exposed gypsum board is not a patch-and-save situation.
Quick Symptom-to-Next-Step Guide
Brown Stain but Drywall Still Feels Hard
This often points to an old leak that may already be fixed. First confirm the leak source is truly gone. Then make sure the drywall is dry before deciding between stain-blocking primer and a small surface repair.
Bubbling Paint or Tape Joints Lifting
This usually means the paper facing got wet and the bond failed. Check whether the gypsum underneath is still firm. If it is soft, cut out the damaged section instead of trying to skim over it.
Soft, Swollen, or Crumbly Drywall
That area usually needs removal. Joint compound is not a structural fix for softened gypsum core.
Musty Smell or Visible Mold
Treat this as a moisture and mold problem first, not just a wall repair. The EPA mold cleanup steps note that porous materials may need to be discarded if moldy.
Sagging Ceiling Drywall
Do not keep pressing on it or trying to patch under it. Ceiling panels can fail. This is a stop-and-call-a-pro situation.
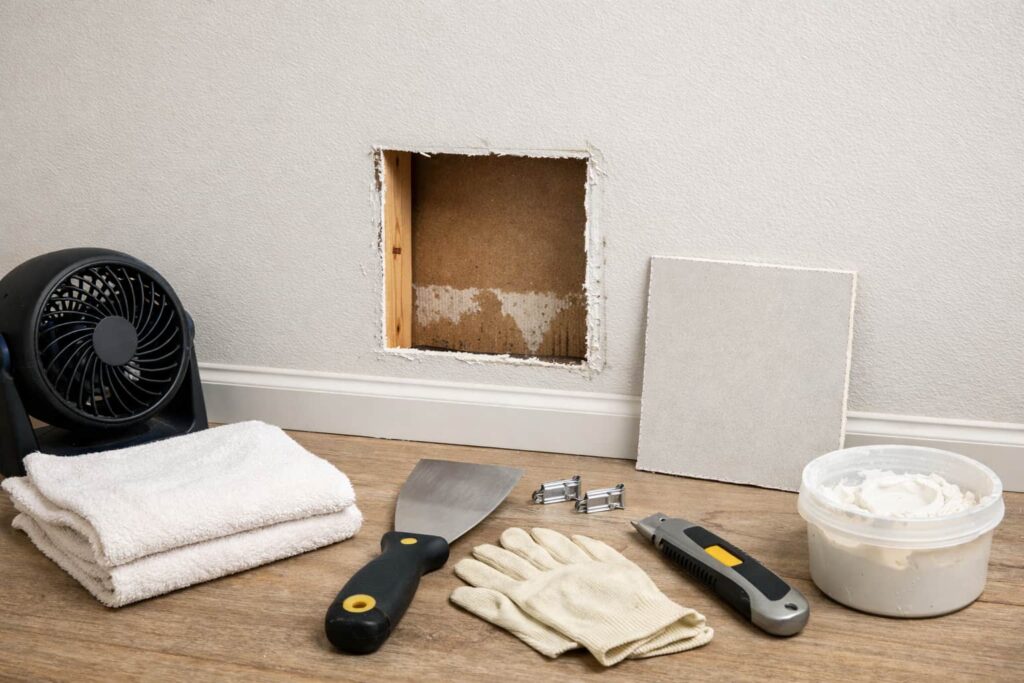
Tools and Materials for a Small Safe Repair
For a localized clean-water repair, you will usually need:
- Utility knife
- Drywall saw or keyhole saw
- Drywall patch piece of matching thickness
- Backing support or repair clips
- Drywall screws
- Paper tape or approved joint tape
- Joint compound
- Taping knife
- Sanding sponge or fine sanding tool
- Primer and paint
- Fan or dehumidifier for drying
- Gloves, eye protection, and a dust mask or respirator suitable for dust
In pre-1978 homes, do not assume normal dust control is enough. The EPA Renovate Right guide explains why disturbing older painted surfaces can create hazardous lead dust.
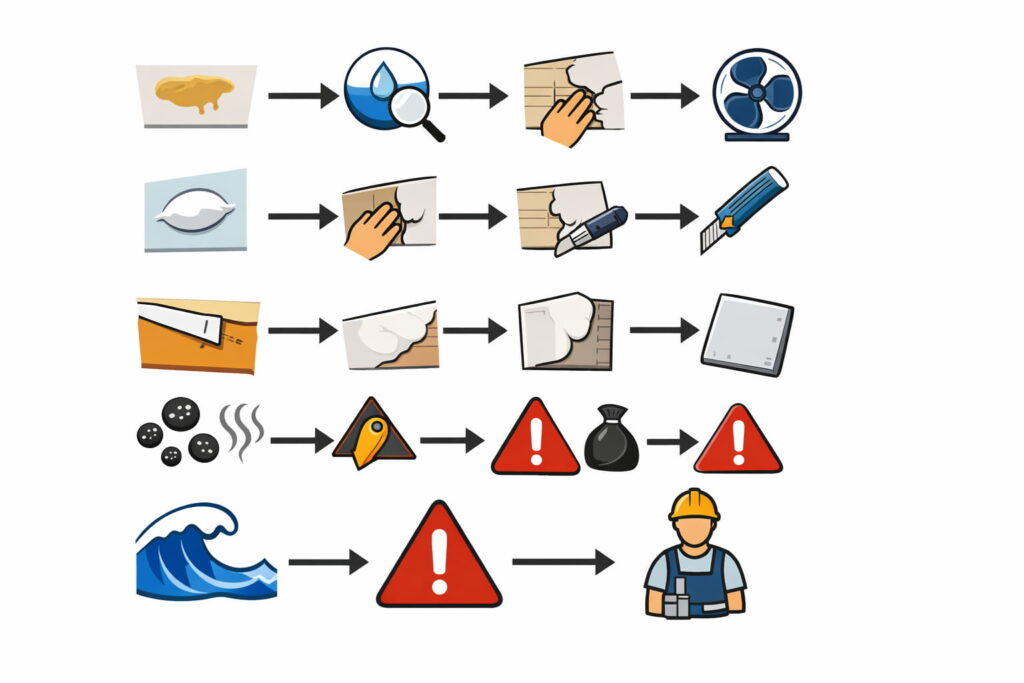
Step-by-Step: How to Repair Water Damaged Drywall Safely
1) Stop the Water Source Completely
Do not repair drywall until the leak is fixed. That could mean repairing a roof leak, tightening or replacing plumbing, clearing an HVAC drain problem, or correcting condensation. If the moisture source is still active, the repair will fail.
2) Dry the Area Thoroughly
Use airflow and dehumidification as appropriate. The EPA says wet or damp areas should be dried within 24 to 48 hours when possible to help prevent mold growth.
Do not skip this step. Mud applied over damp drywall usually leads to more failure later.
Before moving on, make sure the area actually feels ready for repair. The drywall surface should feel dry to the touch, not cool or damp. The paper facing should not feel soft or fuzzy. Nearby trim and baseboards should also be dry, and insulation inside the cavity should not feel wet or compressed. If you are unsure, wait longer or use more drying time before closing the wall.
This video fits here because it reinforces the article’s point that fast drying after water damage helps reduce mold risk.
This FEMA and CDC cleanup video is useful for understanding why wet porous materials sometimes need removal instead of a cosmetic repair.
3) Inspect and Mark the Damaged Area
Look for:
- Soft gypsum
- Loose paper facing
- Swollen seams
- Staining that spreads wider than expected
- Mold spotting
- Damp insulation behind the board
- Moisture around trim, baseboard, or ceiling framing
A moisture meter can help, but even without one, do not patch over material that still feels cool, damp, soft, or unstable.
4) Remove Only the Damaged Drywall You Need to Remove
For a clean-water repair, cut back to dry, solid drywall with clean edges. Standard manufacturer guidance for water-damaged areas follows the same sequence: cut out the damaged section, install backing or repair clips, fit the replacement piece, then tape and finish.
Do not keep opening the wall once you run into wiring, plumbing, or uncertain contamination. That is where the DIY portion ends.
5) Check the Cavity Before Closing the Wall
Before installing a patch, inspect the cavity for:
- Wet insulation
- Mold on framing
- Plumbing drips
- Condensation signs
- Hidden staining above the visible opening
If insulation is wet, it often needs to come out. If the water was floodwater, drywall and insulation that contacted it should be removed, not dried in place.
What to Do if the Insulation Is Wet
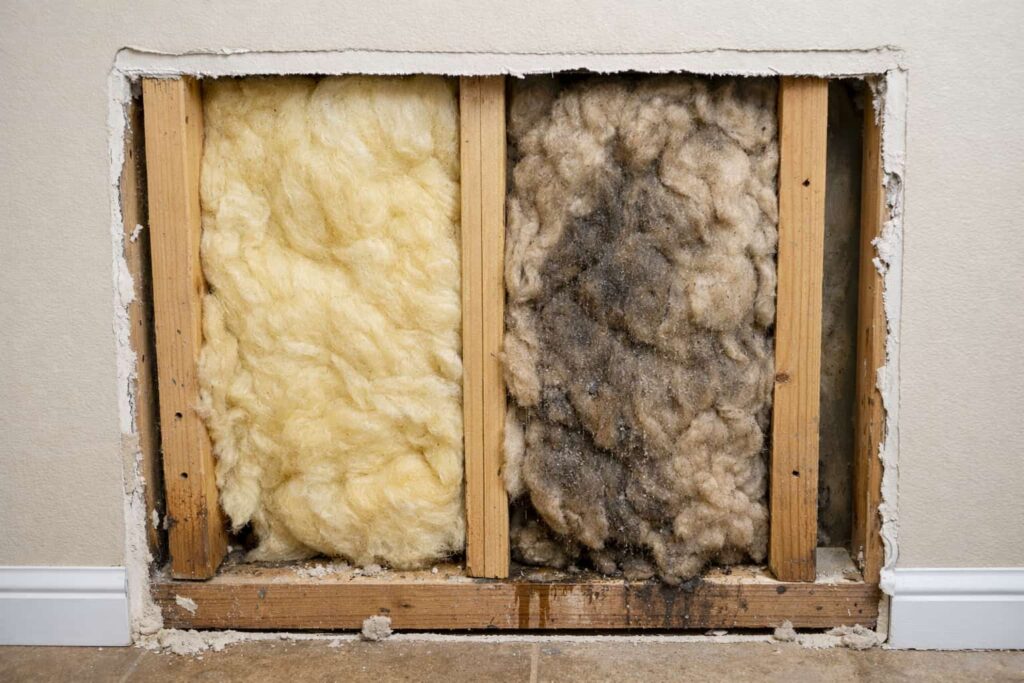
Do not close the wall over wet insulation. Wet fiberglass loses performance and can hold moisture against framing and drywall. If the insulation is damp from a clean-water leak, remove the wet section and let the cavity dry fully before reinstalling new insulation. If the water was contaminated, treat the insulation as contaminated too and replace it rather than trying to dry and reuse it.
6) Install Backing Support and the New Drywall Patch
Cut a replacement piece that matches the wall thickness. Secure backing support or repair clips so the patch can be screwed firmly in place. Fit the new drywall flush with the surrounding wall.
Tip: Do not force a patch into an irregular opening. Clean cuts make finishing easier and reduce cracking later.
This official Sheetrock repair-clip video is the best visual match for the article’s backing-support step in a small localized patch.
This USG patch video helps readers visualize the cut, fit, and finish process after damaged drywall has been removed.
7) Tape and Apply Joint Compound in Thin Coats
Tape the seams and apply joint compound over the joints. Let it dry fully between coats. Add more thin coats as needed, feathering wider each time.
Trying to fix water damaged drywall in one thick coat usually leads to shrinkage, cracking, or a visible hump.
8) Sand Lightly and Control Dust
Once the compound is fully dry, sand lightly to blend the repair. Keep dust control in mind, especially in older homes. If the home was built before 1978 and painted surfaces are being disturbed, lead-safe precautions matter much more.
9) Prime Before Painting
Use primer before repainting the repaired area. Primer helps seal the repaired surface and creates a more even finish. If a stain remains from the original leak, a stain-blocking primer is often needed before finish paint.
10) Monitor the Area After the Repair
After painting, keep an eye on the repaired spot for the next few weeks. If staining returns, paint blisters again, or the patch starts to soften, assume moisture is still getting in somewhere. A recurring stain usually means the leak source was not fully fixed or moisture is still trapped nearby.
What Not to Do
Do Not Patch Over Active Moisture
That only hides the problem. Moisture control has to come first.
Do Not Paint Over Mold
Painting or caulking over mold does not solve it. Fix the moisture problem and deal with the affected material correctly first.
Do Not Save Flood-Contaminated Drywall
Floodwater changes the repair decision. Contaminated drywall and insulation should be removed.
Do Not Mix Bleach and Ammonia
That can create toxic vapors.
Do Not Dry-Sand Painted Drywall in a Pre-1978 Home Without Considering Lead Risk
Lead dust is often invisible, and disturbing old paint can put your household at risk.
When to Replace Drywall Instead of Repairing It
Replacement is the better call when:
- More than a small localized area is affected
- The core has turned soft or chalky
- Seams have failed over a larger section
- The board is bowed or sagging
- Insulation behind it is wet
- Mold extends beyond a simple surface spot
- The water source was contaminated
In real-world terms, this is where many homeowners waste time trying to rescue drywall that has already lost its integrity.
Ceiling Water Damage vs. Wall Water Damage
Ceilings need more caution than walls because gravity makes failure risk worse. A stained wall may hold together long enough for a careful patch. A ceiling with sagging drywall, wet insulation above, or seam separation can become unsafe much faster. If you see bulging, bowing, or screws pulling through, stop and call a pro.
If the damage is in a ceiling below a bathroom, laundry area, or attic plumbing, do not assume the stain marks the full problem area. Water often travels along framing before it shows up below. That is one reason ceiling damage deserves a more cautious inspection than wall damage.
How to Help Prevent Drywall Water Damage From Coming Back
- Repair roof, plumbing, and HVAC leaks quickly
- Use bath fans and kitchen ventilation to reduce moisture
- Keep indoor humidity under control
- Inspect around windows, tubs, showers, and supply lines
- Dry wet materials fast after any leak or spill
- Check ceilings below bathrooms, laundry rooms, and attic plumbing after even small leaks
When to Call a Pro
Call a professional if:
- The leak source is unclear
- The area stayed wet beyond 24 to 48 hours
- Mold may be inside the wall
- The damage involves a ceiling
- The water was contaminated
- The repair will disturb painted surfaces in a pre-1978 home
- Electrical wiring, framing, insulation, or HVAC components may also be affected
FAQs
Can I Just Dry Water Damaged Drywall and Paint It?
Only if the drywall is still solid, the leak is fixed, and there is no mold or contamination. Soft, swollen, moldy, or flood-exposed drywall should not be handled that way.
How Long Should Drywall Dry Before Repair?
There is no single universal time because drying depends on how wet the area got, airflow, humidity, and what is inside the wall. The practical official benchmark is to dry wet materials within 24 to 48 hours when possible to reduce mold risk.
Do I Need to Replace Drywall After a Leak?
Not always. Small clean-water damage can sometimes be patched. Floodwater, sewage exposure, significant mold, or loss of panel strength usually means replacement is the safer choice.
Is Mold Behind Drywall a Reason to Remove It?
Often yes, because drywall is porous and may not be fully cleanable once mold has grown into it.
Can I Use Bleach on Water Damaged Drywall?
That depends on what you are trying to clean, and bleach is not the main answer for a damaged drywall core. If the drywall is moldy and porous, removal is often the better answer. Never mix bleach with ammonia or other cleaners.
Is Drywall Repair Risky in an Older Home?
Yes. In homes built before 1978, cutting, sanding, or demolition around painted surfaces can create lead dust. That changes the safety approach.
Conclusion
Learning how to repair water damaged drywall safely starts with one key decision: is this a small, clean-water patch job, or is it really a removal-and-replace problem? If the leak is fixed, the area is dry, and the surrounding drywall is still solid, a standard cut-out and patch repair can work well. If the drywall is soft, moldy, sagging, or contaminated, stop short of a cosmetic fix and deal with the moisture damage properly first. That is the safest path and the one most likely to last.
Sources / References
EPA — A Brief Guide to Mold, Moisture and Your Home
EPA — What are the basic mold cleanup steps?
CDC — Mold Clean Up Guidelines and Recommendations
FEMA — Don’t Wait to Clean Up or Make Repairs
Gypsum Association — GA-231-2025 Assessing Water Damage to Gypsum Board
USG — Sheetrock Gypsum Panels Installation Guide
USG — Sheetrock Drywall Repair Kits Application Tips
EPA — Renovate Right: Important Lead Hazard Information for Families, Child Care Providers and Schools