

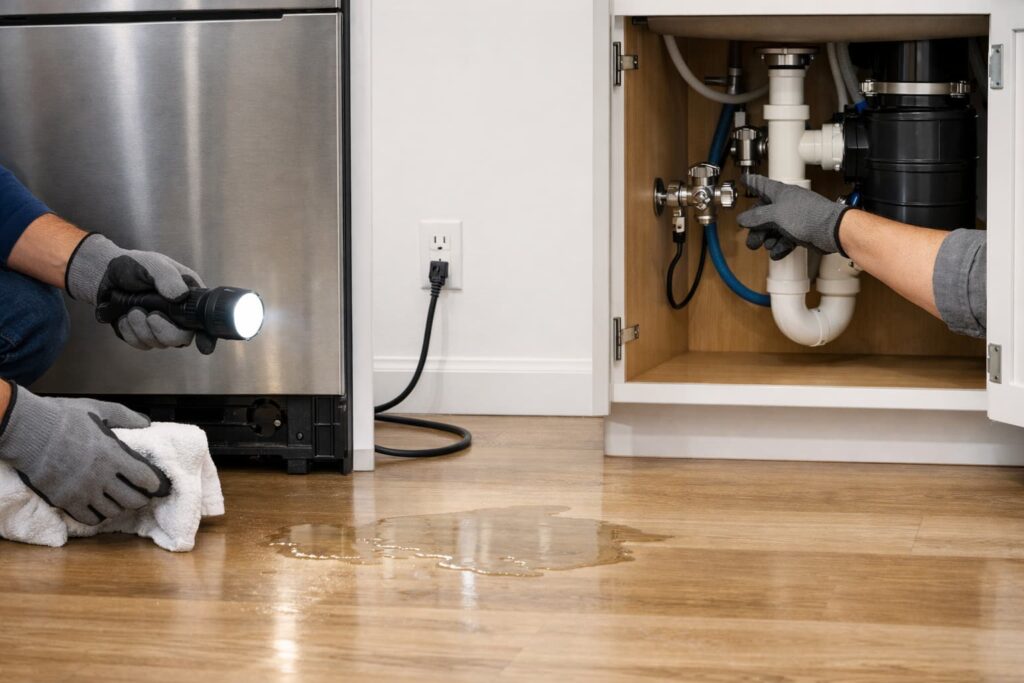
A dishwasher leaking from underneath is usually caused by oversudsing, a door-area leak that runs down, or a supply/drain connection drip under the sink. The safest first move is to stop the cycle, shut off power and water, then do a dry inspection to find the source before you run it again.
what to do first
- Stop the cycle.
- Shut off power (unplug/breaker) and water (under-sink shutoff valve).
- Dry everything.
- Check suds, then under-sink connections, then door seal, then drain hose timing.
Safety first (non-negotiable)
Before you troubleshoot a dishwasher leaking from underneath:
- Turn the dishwasher off and stop the cycle.
- Shut off the water supply at the under-sink valve.
- Disconnect power (unplug if accessible, or switch off the breaker).
- Put towels down and use a flashlight. Don’t kneel in water while checking anything electrical.
For official safety language about shutting off water and electrical supply before service, see Bosch Installation Instructions.
Stop and call a pro immediately if:
- You smell burning, see smoke, sparking, or melted plastic odor
- The breaker trips when the dishwasher runs
- Water is near wiring/junction areas or you see scorch marks
- The leak is heavy, uncontrolled, or returns right away
If a leak is recurring and you suspect any electrical involvement, it’s smart to check recall history for your model. The U.S. Consumer Product Safety Commission (CPSC) recall notice shows why some leak conditions can become a safety hazard in certain models.
To check recalls accurately, locate your dishwasher’s model/serial tag (commonly on the inside edge of the door or the frame). Write it down before you search.
Quick symptom splitter (60 seconds)

Use this to choose the right checks—fast.
1) Do you see lots of foam/suds inside the tub?
- Yes → go straight to Oversudsing below.
- No → keep going.
2) When does the leak show up?
- Early in the cycle / during fill → supply-side drip (valve/hose/connection) or fill-related leak
- Near the end / during drain → drain hose or drain connection leak
- Anytime / intermittent → door-area leak running downward, or an internal leak collecting in the base
3) Where is the water most obvious?
- Under-sink cabinet → supply or drain connection
- Front toe-kick/floor in front → door leak or oversudsing (water can travel forward)
- Centered under the unit → hidden internal leak/base-pan water
Top causes of a dishwasher leaking from underneath (and safe fixes)
1) Oversudsing (wrong detergent or too much)
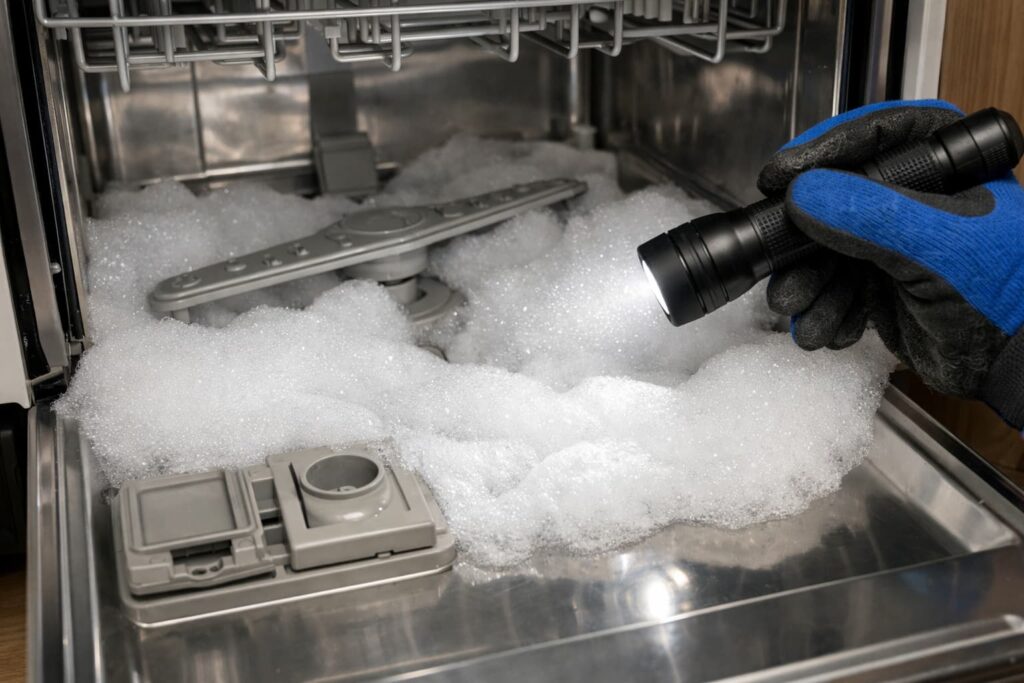
Oversudsing is a top “it looks like it’s leaking underneath” culprit.
Signs
- Suds/foam in the tub
- Leak appears during wash action and may creep toward the front
Safe fixes
- Stop the cycle and let suds dissipate before restarting.
- Confirm you’re using dishwasher detergent (not hand dish soap).
- Use the detergent amount recommended for your dishwasher and water hardness.
GE specifically calls out oversudsing as a common cause of leaks/flooding underneath. Use GE Appliances Support for their official guidance.
2) Door-area leak that runs down and pools underneath
Even if water ends up under the unit, the leak may start at the door and travel downward.
Signs
- Dampness around door edges
- Water at front corners/toe-kick area
- Leak seems worse with heavy spray cycles
Safe fixes
- Wipe the door gasket clean (crumbs and residue can prevent a seal).
- Make sure dishes or rack parts aren’t preventing the door from closing.
- Confirm the door closes firmly and latches normally.
For manufacturer guidance on common leak causes including door sealing/latch issues, see Whirlpool.
Helpful video (door-seal related)
Shows how a door gasket is replaced on a GE dishwasher—useful if your leak is actually running down from the door area.
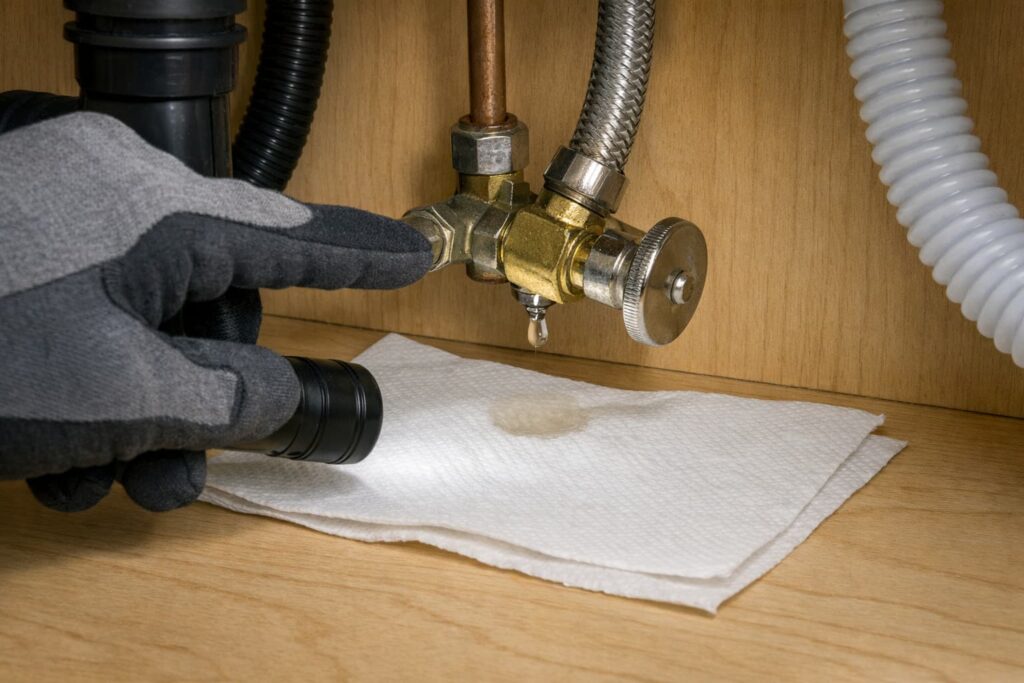
3) Under-sink water supply connection drip (easy to miss)
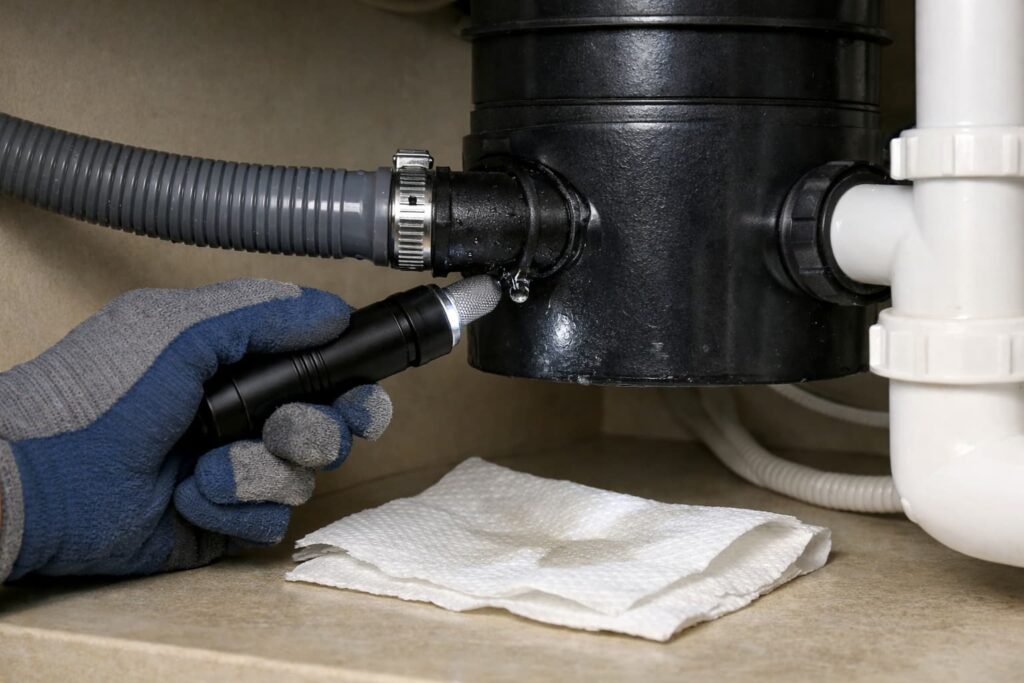
A slow drip at the shutoff valve or supply connection can run down and look like a dishwasher base leak.
Signs
- Wet cabinet floor under the sink
- Drips on the valve, hose, or connection points
- Mineral trails or staining near fittings
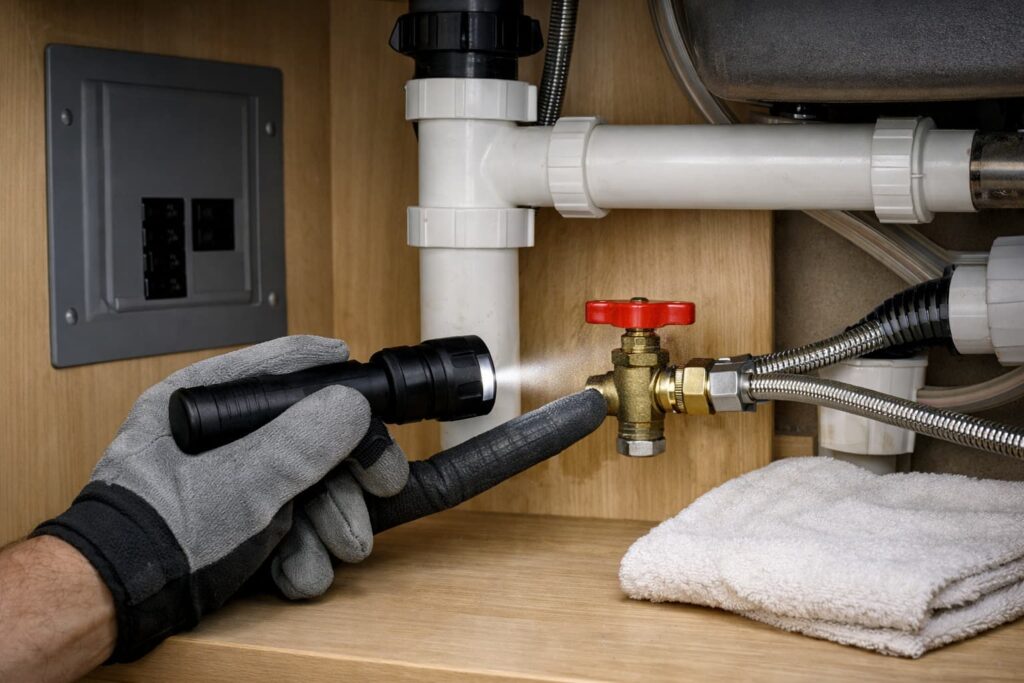
Safe checks
- With the area dry, briefly turn the water back on (dishwasher still off) and watch for fresh drips.
- If the supply hose looks kinked, damaged, or very old, replacement is often safer than trying to “tighten until it stops.”
A GE installation document includes a practical prevention step: label a braided supply hose with the install date and replace supply components on a set interval. Use GE Built-In Dishwasher Installation Instructions for the exact guidance.
4) Overfilling/float-related issues (water level too high)
Sometimes a dishwasher can leak because the water level gets too high, then spills or escapes into the base.
Signs
- Water level looks unusually high inside the tub
- Leak starts early and may continue through the cycle
Safe checks
- Make sure nothing is blocking the tub’s float area (if visible) and that dishes aren’t interfering with normal movement.
- If overfilling seems likely, don’t keep running cycles—it can quickly lead to water in the base area.
Next step
Overfill conditions often require service (inlet/level control/float components vary by model). If you suspect overfilling, it’s typically best to call a qualified technician.
4) Drain hose or drain connection leak (often leaks during drain)
If the leak shows up mostly near the end of the cycle, focus on the drain system.
Signs
- Leaks happen when you hear the dishwasher pumping out
- Wetness at the drain hose connection under the sink
- Moisture along the hose route (kinks can contribute to problems)
Safe fixes
- Inspect the drain hose for cracks, loose clamps, or rubbing points.
- Confirm the hose routing and connection match your installation instructions (routing matters).
Bosch provides a clear visual guide for safe connection checks at the sink/disposal. Use Bosch Dishwasher Connection Guidance to compare setup.
Also check drain hose routing: If the drain hose is routed low or poorly supported, it can stress connections and increase the chance of drips during drain. Make sure the hose is secured and routed according to your installation instructions (some setups use a high loop and/or air gap depending on local plumbing requirements). If you’re unsure, a plumber or appliance tech can confirm the correct routing for your kitchen setup.
5) Hidden internal leak collecting in the base (base-pan water)
Some leaks happen inside the unit and end up in the bottom/base area, then appear as water “underneath.”
Signs
- Door area looks dry, but water keeps returning under the unit
- Leak is intermittent
- You can’t find any under-sink drips
Quick reality check: Sometimes water in the base is triggered by a slow internal seep or even a spill/leak from dispensers (like rinse aid) that works its way down over time. If you recently refilled rinse aid or noticed dispenser wetness, clean and dry the area and monitor for recurrence—but avoid repeated test runs if water is reaching the base.
Safe next step
- Don’t keep running “test cycles” if the source isn’t obvious.
- If you suspect base-pan water or a leak-sensor condition, consider manufacturer guidance and/or service—especially to avoid electrical risk.
Helpful videos (leak detected / base-pan scenarios)
Explains Bosch E15 “leak detected” basics—helpful when water in the base triggers protection.
Explains GE leak protection behavior—useful if the unit stops or behaves like a leak sensor is involved.
Rare but important: Tub cracks, rust-through, or bottom seam damage
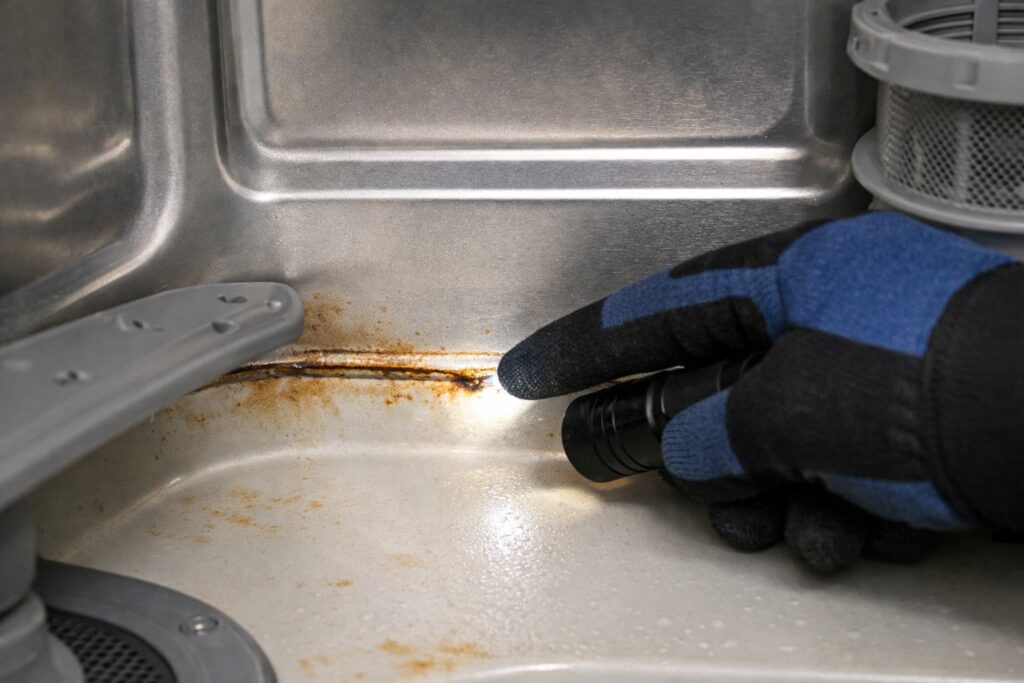
On older units, a crack or rusted-through spot can leak and collect underneath.
Signs
- Persistent leaks with no obvious hose/door source
- Rust spots or staining near the bottom inside edges
Safe next step
If you suspect tub or seam damage, it’s usually a replace-or-pro diagnosis situation. Avoid running more cycles and schedule service to confirm.
Step-by-step troubleshooting (safe order that saves time)
Step 1: Make it safe and visible
- Power off (unplug/breaker)
- Water supply off
- Dry the floor and cabinet area completely
Step 1A: Pinpoint when the leak happens (no-guess method)
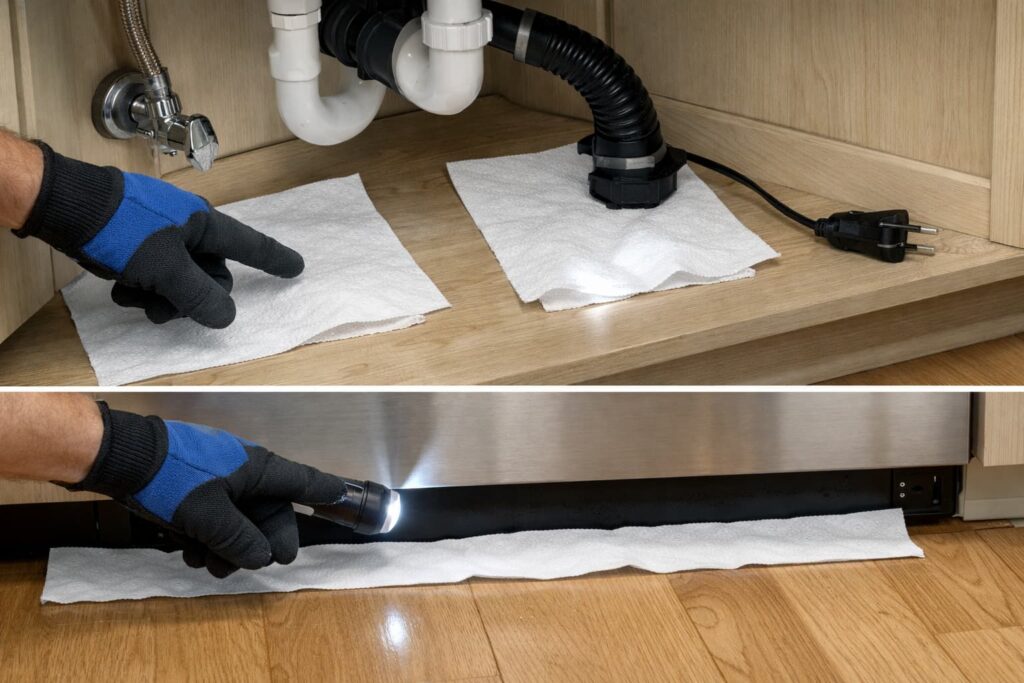
After shutting off power and water, dry the floor and under-sink cabinet completely. Then place a few dry paper towels (or a folded paper towel “strip”) in these spots:
- Under the under-sink supply connection and shutoff valve
- Under the drain hose connection (disposal or sink drain)
- Along the front toe-kick area (outside the dishwasher, not under live wiring)
Run a short cycle only after you’re confident it’s safe to do so and stay nearby. Check the towels:
- Wet early in the cycle → often points to supply-side
- Wet at the end/when draining → often points to drain-side
- Wet at the front/toe-kick during wash → often points to door/oversudsing
If you can’t identify the source quickly—or water appears near electrical areas—stop and call a pro.
Step 2: Check for oversudsing
- Open the door carefully and look for foam/suds.
- If yes, fix detergent use first (it can mimic multiple other failures).
Step 3: Check under-sink plumbing (fastest win)
Look closely at:
- Shutoff valve area
- Supply line/fittings
- Drain hose connection at disposal/sink drain
Step 4: Check the door seal and closure
- Clean gasket contact surfaces
- Remove rack/dish obstructions
- Confirm latch closes firmly
Step 5: Match leak timing to the system
- During fill → supply-side
- During drain → drain system
- Intermittent → door travel-down leak or internal/base leak
Step 6: Decide DIY vs. pro service
DIY is reasonable for:
- Detergent/oversudsing corrections
- Cleaning the gasket and clearing obstructions
- Identifying obvious under-sink drips
Call a pro when:
- The leak source appears internal/base-related
- The leak persists after these checks
- Any electrical symptom appears (odor, smoke, sparking, breaker trips)
Prevent leaks before they start
- Use the correct dishwasher detergent and don’t overfill it (oversudsing is common).
- Periodically check under-sink fittings for slow drips.
- Track supply hose age and replace on a safe schedule (especially if you see wear).
- If leaks repeat, check recall history for your exact model.
FAQs
Why is my dishwasher leaking from underneath but the door area looks dry?
It’s often a supply/drain connection drip under the sink or an internal leak that collects in the base. Dry everything and check under-sink fittings first.
Can the wrong detergent cause a dishwasher leaking from underneath?
Yes. Oversudsing can force water/foam out and look like a leak underneath. Fix detergent type and amount before deeper troubleshooting.
How do I tell if the leak is from the supply line or the drain hose?
Timing is the clue: supply-side issues often leak during fill/early cycle; drain issues often leak near the end when pumping out.
Should I keep running cycles to find the leak source?
No. If water is reaching the base area or you suspect electrical proximity, repeated cycles can increase damage and safety risk.
When should I shut off the breaker for a leaking dishwasher?
If it’s leaking from underneath, disconnect power before inspecting. Shut off the breaker immediately if there’s burning smell, smoke, sparking, or breaker trips.
Could a recall be related to leaking?
Sometimes. If leaks recur or any electrical symptom appears, checking recall history for your model is a smart safety step.
Conclusion
A dishwasher leaking from underneath is most often traced to oversudsing, door-area leaks running down, or under-sink supply/drain connections. Start with safety: shut off power and water, dry everything, then follow the symptom splitter and timing checks. If the source isn’t obvious—or anything suggests electrical risk—stop and bring in a qualified technician.