

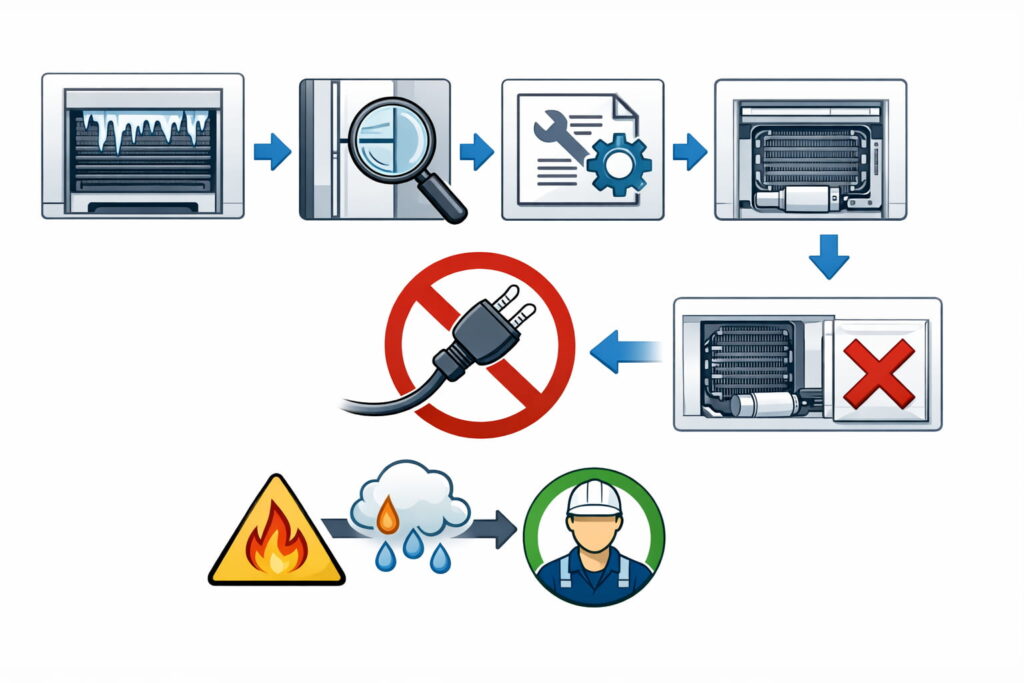
Refrigerator defrost heater replacement can be a safe DIY repair only if you can access the evaporator area without forcing panels and you fully disconnect power first. This job is most often needed when frost/ice builds up behind the freezer’s rear panel and airflow drops.
Below is a safety-first, model-aware guide that helps you confirm the symptoms, avoid replacing the wrong part, and know when to stop.
Quick Checks First
- Unplug the refrigerator (not just “Off” on the display).
- If the freezer back panel is packed with frost and airflow is weak, a defrost-system issue is likely.
- Find your model’s tech sheet/service info before you order parts (forced defrost steps vary by model).
- Take photos of wire routing and connectors before disconnecting anything.
- Replace the heater only if you can access it without forcing panels or stressing wiring/tubing.
- Reinstall the evaporator cover flush (air leaks here can cause repeat frosting).
- Stop and call a pro for burning smells, suspected refrigerant leaks, or stubborn panels that won’t release.
Safety first (don’t skip)
Do this before any access panels come off
- Unplug the refrigerator (don’t rely on the display “Off” setting).
- Wear work gloves (sharp sheet metal and plastic edges are common).
- Protect food (coolers/ice packs) and lay towels to catch meltwater.
STOP and call a pro if…
- You smell burning, see smoke, or notice sparking/arcing.
- You suspect a refrigerant leak (chemical smell, hissing, oily residue).
- You would need to move, bend, or detach any copper/aluminum tubing or anything that looks like sealed refrigeration lines
- You must pry hard, bend panels, or work near sealed-system tubing you can’t identify.
- You’re not confident working around electrical connectors and fragile evaporator fins.
What the defrost heater does (and what failure looks like)
In frost-free refrigerators, the defrost system melts evaporator frost periodically so air can move through the coil and vents. When the defrost heater doesn’t heat during defrost, frost can build until airflow is restricted.
Typical signs of a defrost-system problem:
- Heavy frost/ice behind the freezer’s rear interior panel
- Weak airflow from vents
- Fresh-food section warming while the freezer is “sort of cold”
- Long runtimes and inconsistent temperatures
Tip: Frost can also be caused or made worse by door seal leaks and frequent door openings. If you have an LG, the brand explains common causes of frost buildup and basic corrective steps in LG Refrigerator Frost Buildup.
Quick troubleshooting map (before you replace anything)
If the freezer back wall is frosted solid
- Confirm doors shut fully and gaskets seal.
- Make sure vents aren’t blocked by food packages.
- Locate your model’s service info / tech sheet if available.
For Whirlpool-family units, this is the best starting point:
Use diagnostics only if you have the correct model procedure
Many refrigerators have a forced defrost / service test mode, but the button sequence is model-specific. Whirlpool publishes example tech sheets that show forced defrost entry and service mode structure, such as Whirlpool Tech Sheet W10787418 (Rev C).
If you can’t confidently match your model to a specific tech sheet, don’t guess—move to visual inspection, or call a technician.
Find your model number before ordering parts (don’t skip)
To get the correct defrost heater, locate your refrigerator’s model number and write it down. Common model tag locations include:
- Inside the fresh-food section on a side wall near the crisper drawers
- On the ceiling or side wall inside the refrigerator compartment
- On a sticker behind the lower kickplate/toe grille (some models)
- On the back exterior panel (less common)
Use the exact model number (and revision, if listed) when searching parts—many heaters look similar but won’t match the mounting points or connector style.
Tools and supplies
- Gloves + flashlight/headlamp
- Screwdrivers (common: Phillips / 1/4″ hex)
- Small container for screws
- Towels and a shallow tray (for meltwater)
- Phone camera (to record wire routing)
Optional (only if you already know how): a multimeter for continuity checks.
Optional: quick “is the heater likely bad?” check (only if you already know how)
If you’re comfortable using a multimeter and the refrigerator is unplugged, a basic continuity check can help avoid replacing the wrong part:
- Test the defrost heater for continuity at its connector leads (an open circuit often indicates a failed heater).
- If the heater tests OK, the issue may be a defrost thermostat/thermal fuse, wiring, or the control not initiating defrost.
If you’re not confident performing electrical tests safely, skip this and rely on model-specific diagnostics or a technician.
Refrigerator defrost heater replacement: step-by-step
Because layouts vary, the goal here is a safe “universal” process that avoids risky disassembly.
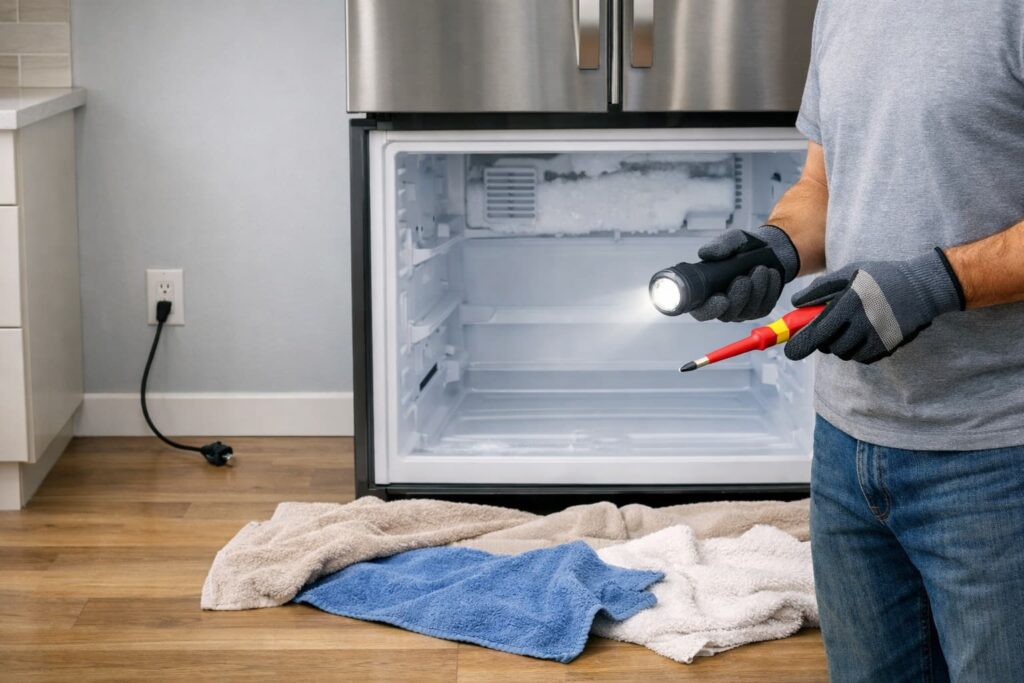
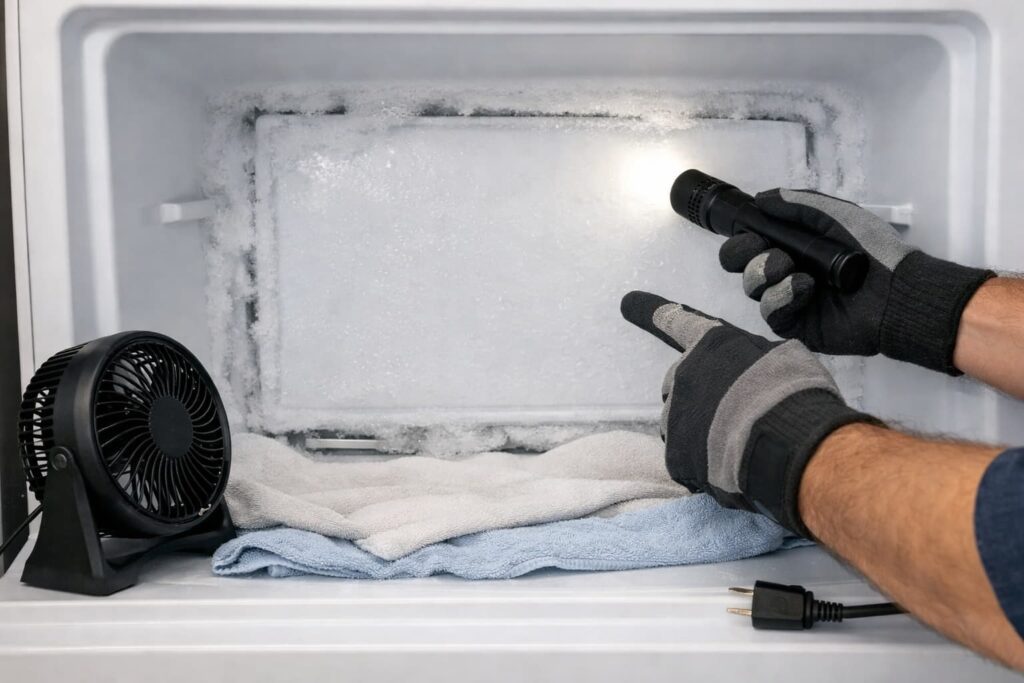
1) Prep the freezer compartment
- Move food to a cooler.
- Remove shelves, bins, and the ice bucket (if present).
- Put towels down to protect flooring.
2) Disconnect power
- Unplug the cord from the outlet. Verify interior lights are off.
3) Remove the freezer rear interior panel (evaporator cover)
- Remove visible screws and clips.
- Pull gently and evenly.
If it won’t come free without force, stop. You may have missed a hidden fastener or the panel may be ice-bonded.
If the panel is ice-bonded: thaw it safely (don’t force it)
If the rear panel won’t release easily, it may be frozen in place. Forcing it can crack plastic liners, snap ducts, or tear wiring.
- Keep the unit unplugged.
- Remove loose ice by hand only (no sharp tools).
- Let the door stand open to thaw gradually and place towels to catch meltwater.
- If you use warm air, keep it gentle and moving—avoid overheating plastic parts and never use open flames.
Once the panel loosens, remove it slowly and watch for hidden wire connections before pulling it away.
4) Confirm you’re looking at a “defrost problem” frost pattern
- Heavy, even frost across the evaporator area and air channels suggests defrost/airflow issues.
- Localized ice can also point to airflow or drain issues.
If you’re unsure, consider professional diagnosis—replacing parts blindly often wastes money.
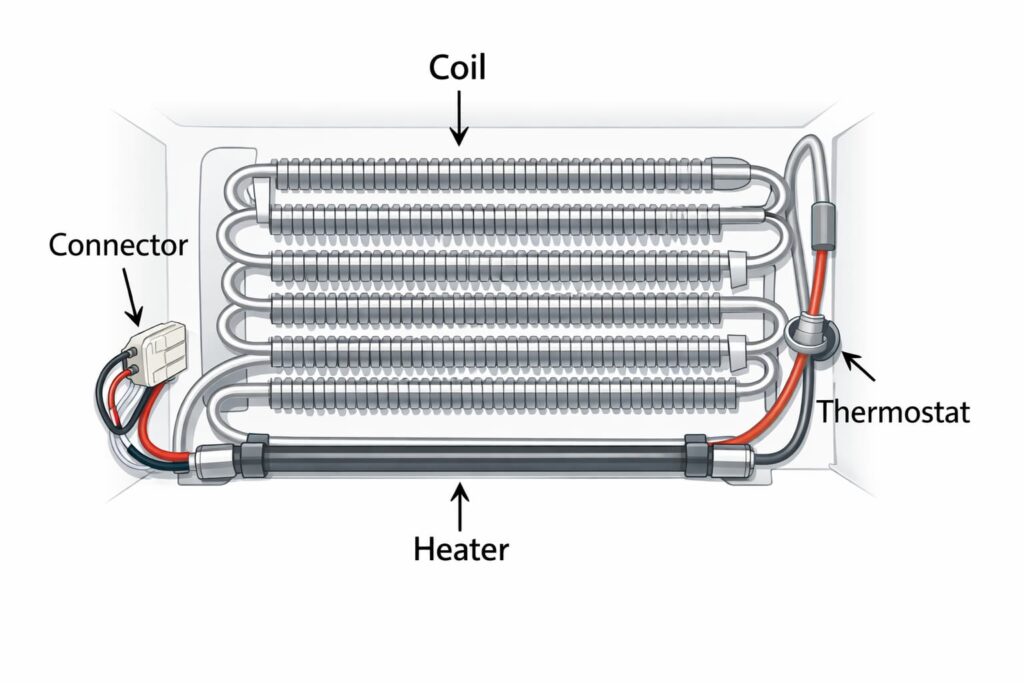
5) Identify the defrost heater and related parts
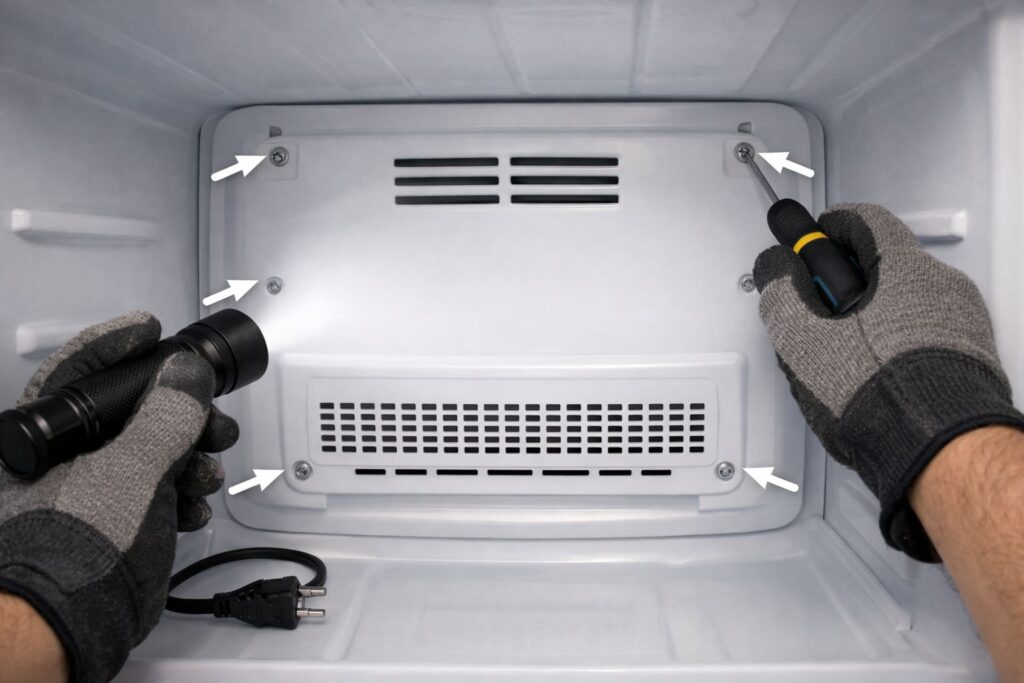
You’ll typically see:
- The defrost heater mounted along the evaporator (often bottom edge)
- A defrost thermostat/bi-metal or other temperature safety device
- Harness connectors routed along the evaporator cover area
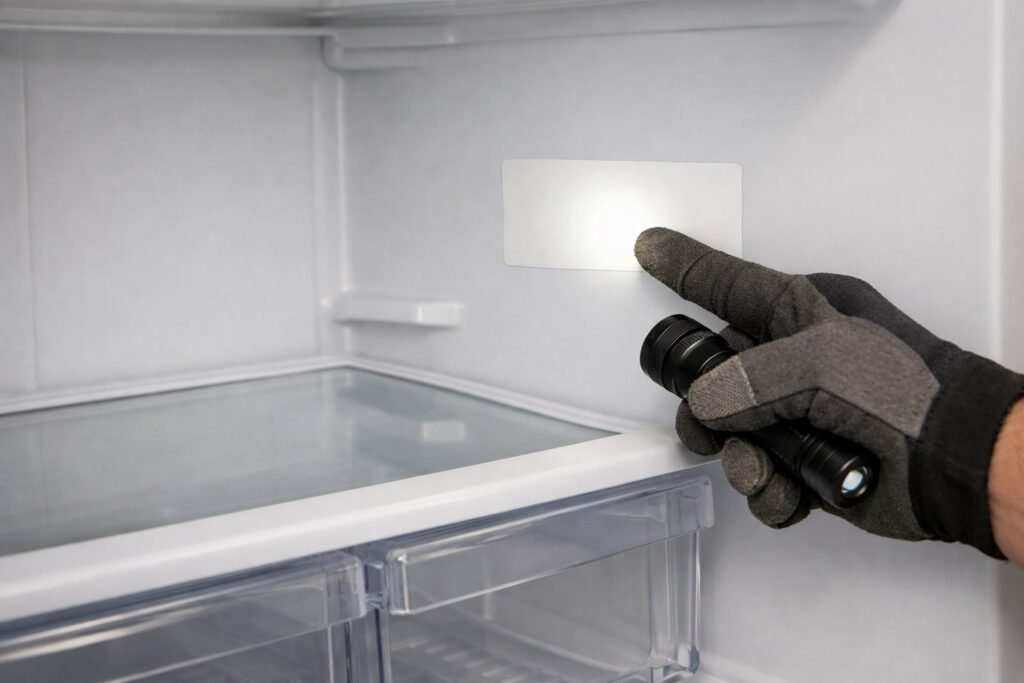
Take clear photos of:
- Connector locations
- Wire routing and clip positions
- Any insulating sleeves or foam pieces
6) Disconnect the heater connector(s)
- Release locking tabs properly.
- Pull on the connector body, not the wires.
7) Remove the old heater
- Release clips/brackets carefully.
- Avoid bending fins or pressing on tubing.
8) Install the correct replacement heater (exact part for your model)
- Seat it fully in the same mounting points.
- Route wires exactly as your photos show.
- Ensure connectors are fully seated and locked.
9) Reassemble and restore power
- Reinstall the evaporator cover so it sits flush (air leaks here can cause weak airflow and repeat frosting).
- Put shelves/bins back.
- Plug in the refrigerator and close doors.
10) Verify basics
- You should feel stronger airflow once temperatures stabilize.
- Avoid rapid thermostat changes; give the unit time to recover.
If your model supports it and you have the correct procedure, you can confirm defrost function via your service diagnostics (again: model-specific). For Whirlpool-family designs, Whirlpool Tech Sheet W11509412 (Rev A) is an example of how forced defrost options can be documented.
Common mistakes that cause repeat frosting
- Reinstalling the evaporator cover with gaps or misaligned ducts
- Pinching wires under the cover or through a grommet
- Installing the wrong heater part number (look-alike parts are common)
- Missing the real cause (door seal leak, fan issue, blocked drain, control issue)
- Ignoring a partially blocked defrost drain (meltwater can refreeze and create ice buildup that mimics a heater failure)
If the panel is ice-bonded: thaw it safely (don’t force it)
When it might not be the defrost heater
Even with frost symptoms, these can be the real cause:
- Door not sealing (gasket damage, misalignment)
- Evaporator fan not running (air can’t move across the coil)
- Drain problems causing refreeze/ice blockages
- Defrost control or sensor issues preventing heater operation
If you’re repeatedly defrosting manually or the frost returns quickly, a technician diagnosis may be the fastest path.
Helpful YouTube videos (inserted where they add real value)
If your Samsung isn’t cooling (check Cooling Off / Demo Mode first)
This official Samsung video shows how Cooling Off (Demo) mode works and how to exit it on compatible models.
Whirlpool forced defrost / diagnostic mode (model-specific)
Helpful visual reference for Whirlpool-style diagnostics and forced defrost entry—use only if it matches your exact control layout.
LG defrost heater access and replacement (example walkthrough)
Shows evaporator-area access and heater replacement steps—use as a visual aid, but verify part and layout by model.
Samsung French door defrost heater replacement (example walkthrough)
Shows panel removal and heater location on a Samsung French door style—confirm your exact model before following.
GE defrost heater replacement (example walkthrough)
Good visual reference for heater location and reassembly on a GE-style design—match your model first.
FAQs
Can refrigerator defrost heater replacement be DIY?
Yes for many models, as long as you can remove the evaporator cover without forcing it and you unplug the unit first. If you must pry, stop and call a pro.
Do I have to unplug the refrigerator for this repair?
Yes. Unplug before removing interior panels or touching wiring/connectors.
How do I know I’m dealing with a defrost problem?
A classic sign is heavy frost behind the freezer rear panel plus weak airflow. Door seal issues can also contribute; see LG Refrigerator Frost Buildup for a brand example of frost causes.
Should I use forced defrost mode to test the heater?
Only if you have the correct, model-specific service procedure. Whirlpool tech sheets show how some models enter forced defrost and service modes, but sequences vary by model.
What if I replaced the heater and frost still comes back?
Another part in the defrost system may be preventing heater operation (sensor/bi-metal/wiring/control), or you may have an airflow/drain/door-seal issue.
What’s the biggest risk during this repair?
Electrical shock (if power isn’t truly disconnected) and physical damage to evaporator fins/tubing or wiring due to forced disassembly.
What’s a fast “non-repair” check if my fridge suddenly stopped cooling?
If you have a Samsung, confirm it’s not in Cooling Off/Demo mode. Samsung documents this on Samsung Support: Refrigerator shows OF OF, O FF, or scrolling bars.
Conclusion
Refrigerator defrost heater replacement can fix chronic frost buildup and weak airflow—but only when the heater is the real failure and the repair is done safely. Unplug the unit, avoid force, document wiring with photos, and reassemble the evaporator cover carefully to prevent repeat icing. If you encounter electrical odor, suspected refrigerant issues, or stubborn panels, stop and call a qualified appliance technician.