

Low-flow showers are frustrating, but they’re often easy to solve. The best shower head low pressure fix is to test flow at the shower arm, then clean the showerhead (and its inlet screen) to remove mineral buildup or debris. That approach fixes the most common causes without risking finishes, warranties, or efficiency compliance.
Quick diagnosis: Is it the showerhead—or the plumbing?
If ONLY this shower is weak
Most likely causes:
- Mineral scale clogging spray nozzles
- A clogged inlet/debris screen inside the showerhead or handheld connector
- A kinked or partially blocked handheld hose
If MULTIPLE fixtures are weak
Think bigger than the showerhead:
- Main shutoff valve not fully open
- Pressure regulator (PRV) issue
- Supply problem, leak, or piping restriction
If you’re seeing low pressure around the house, start with the safe homeowner checks outlined in Town of Harrisburg, NC — Low Water Pressure (PDF).
Safety first (read this before you touch anything)
- Put down a towel or mat to prevent slips.
- Protect finishes: avoid harsh abrasives and metal-on-metal tool contact.
- Don’t try to “fix” pressure by removing restrictors—some manufacturers warn against it and note warranty implications. See Delta Support — Can I remove water restrictors in shower heads or aerators?.
- Stop and call a plumber if you spot leak damage (stains, wet drywall), sudden whole-home pressure drops, or you’ll need to open anything behind the wall.
What you’ll need (2 minutes to gather)
- Old towel or rubber jar-opener pad (to grip without scratching)
- Adjustable wrench (optional) + soft cloth to protect finishes
- Thread seal tape (PTFE/Teflon tape) for reinstall (optional but helpful)
- Small bowl + soft toothbrush
- White vinegar + warm water (only if your manufacturer allows it for your finish)
- Zip-top bag + rubber band (for “bag soak” cleaning method)
- Small cup or bucket (for quick flow checks)
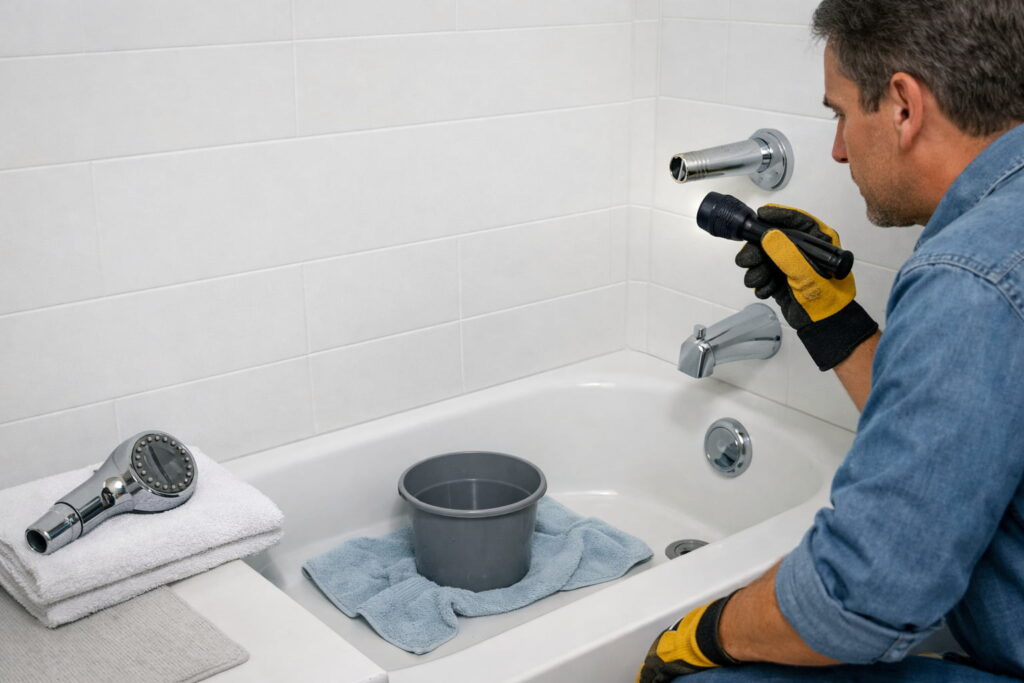
Step 1: Do the fastest test (remove the showerhead)
This tells you whether your “low pressure” is in the showerhead or upstream.
- Put a towel in the tub for grip and to protect surfaces.
- Unscrew the showerhead (hand-tight first; use a wrench only if needed).
- Briefly turn on the water and check flow from the shower arm (the pipe from the wall).
What it means
- Strong flow at the shower arm: the showerhead/hose/screen is the likely culprit → proceed to cleaning.
- Weak flow at the shower arm: the issue is upstream (valve/cartridge, PRV, supply, piping) → skip to the “Stop/call a pro” section.
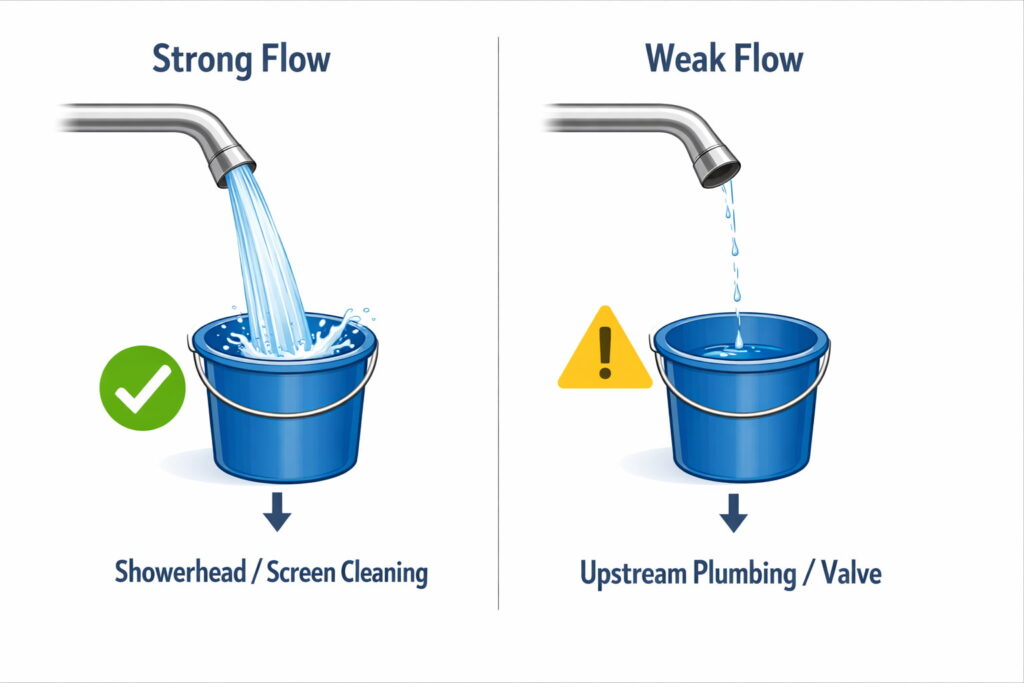
Optional: Quick flow reality-check (helps confirm progress)
If you want a simple before/after check, time how long it takes to fill a container at the shower arm (or through the showerhead after reinstall). Use the same container and the same water setting each time. If fill time improves after cleaning, you’ve confirmed the restriction was in the head/screen—not “pressure” from the house.
Step 2: Clean mineral buildup (the most common DIY win)
Hard-water minerals can choke spray nozzles and internal passages.
A manufacturer-supported cleaning method
Moen commonly references soaking parts in a 50/50 white vinegar + warm water solution to help dissolve mineral buildup. Start with their official guidance (and follow your product’s instructions).
Moen product page (example cleaning guidance)
Cleaning safety note: Don’t mix vinegar with other cleaners (especially bleach-based products). Rinse the showerhead thoroughly between any cleaning steps, and follow your manufacturer’s cleaning instructions for your specific finish.
Finish-safe reminder (important)
Cleaning rules can vary by finish, and improper cleaners can damage coatings. Use your brand’s finish-care guidance, such as:
Moen — Faucet Finish Care and Cleaning
Reinstall without leaks (and without damage)
When reinstalling the showerhead, wrap the shower arm threads with 2–3 turns of PTFE (thread seal) tape (optional but helpful), then hand-tighten. If you need a wrench, use a cloth between the tool and the fixture and tighten gently—over-tightening can crack parts or damage finishes. After turning water on, check for drips at the connection.
Helpful visual demo (bag soak method)
Shows a clear, beginner-friendly way to soak and flush a showerhead to restore flow.
Step 3: Check and clean the inlet screen (often the real blockage)
Many showerheads and handheld wands have a small mesh screen where water enters. If it clogs with grit/sediment, pressure drops.
Where it usually is
- Inside the showerhead inlet (where it threads onto the shower arm)
- Inside the handheld connection (where the hose connects)
- At the hose ends
What to do
- Rinse the screen under running water.
- If it’s gritty, soak briefly (per your manufacturer guidance), then rinse again.
- Flush the shower arm for a few seconds before reinstalling the showerhead.
Step 4: If you have a handheld, check the hose and diverter
- Fully straighten the hose and look for kinks.
- Disconnect the hose and briefly test flow at the connection point.
- If your setup has a diverter, make sure it fully clicks/seats in “shower” position (a partially engaged diverter can reduce flow).
Quick safety note for handheld setups
If you remove the handheld hose for testing, avoid letting the open hose end drop into standing bathwater or a bucket full of water while the faucet is running. Keep outlets above the waterline during testing to reduce backflow risk.
If flow improves with the hose removed, the hose or fittings are likely restricted.
Step 5: Don’t remove flow restrictors to “fix” pressure
It’s tempting, but it’s rarely the smartest (or safest) path.
- Some manufacturers explicitly advise against restrictor removal and warn about warranty concerns: Delta Support explains this clearly in Delta Support — Can I remove water restrictors in shower heads or aerators?.
- Showerheads are also part of regulated efficiency standards—here’s the background on definitions and standards context: Federal Register — Energy Conservation Program: Definition of Showerhead.
Better approach: clean the showerhead and screen, then upgrade to a model designed to perform well at your household pressure.
Step 6: Upgrade smart if your pressure is just “low”
Sometimes the plumbing is fine—your home pressure is simply on the lower side, and your current showerhead doesn’t handle it well.
What to look for (performance + efficiency)
WaterSense-labeled showerheads are certified for both efficiency and performance (spray force/coverage). WaterSense showerheads must be ≤ 2.0 gpm, while standard showerheads are commonly 2.5 gpm.
US EPA — WaterSense Showerheads
EPA also explains performance testing across different pressures (including lower-pressure scenarios) here:
US EPA — WaterSense Specification for Showerheads Supporting Statement (PDF)
Quick install walkthrough (official)
Official EPA WaterSense video showing how to replace a showerhead correctly and safely.
Whole-home low pressure checks (only if multiple fixtures are weak)
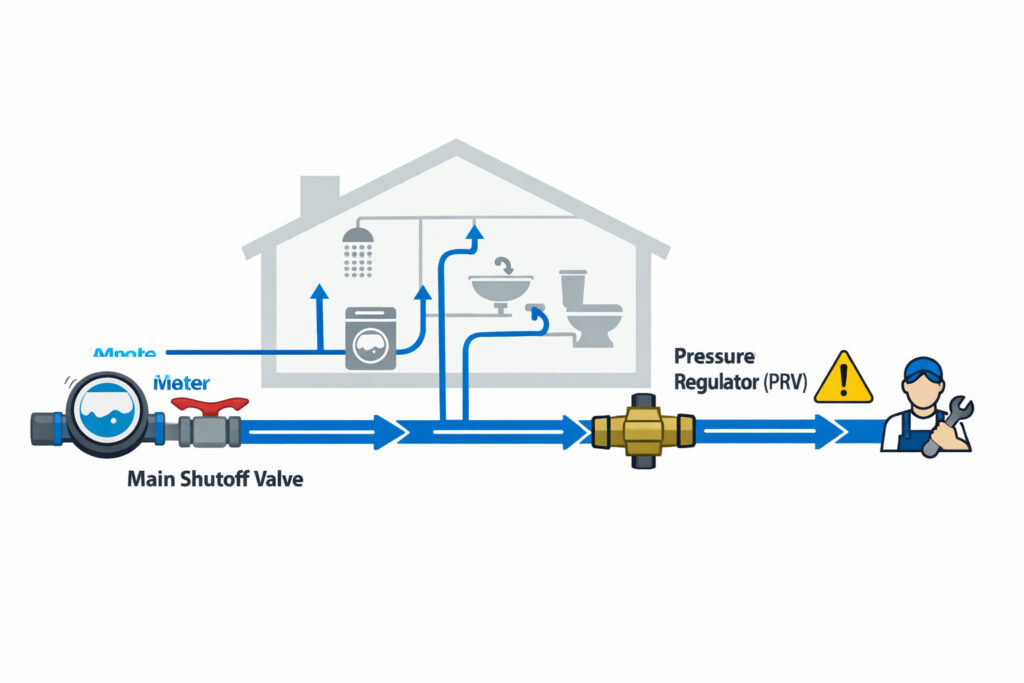
If your sinks, showers, and hose bibs all feel weak:
Two common whole-home culprits to know about
- Main shutoff valve: If it’s partially closed, pressure can drop everywhere. (Gate-style valves can also fail internally and not open fully.)
- Pressure regulator (PRV): Many homes have a PRV near the main line; if it fails or is mis-set, it can reduce pressure across the house. If you suspect PRV issues, it’s usually best handled by a plumber.
- Confirm the main shutoff valve is fully open.
- Ask neighbors if they have the same problem (possible supply issue).
- Look for obvious leak signs (stains, wet spots, meter running when water is off).
Use this guide as your “big picture” checklist:
Town of Harrisburg, NC — Low Water Pressure (PDF)
Stop and call a plumber
Call a pro if:
- Flow is weak at the shower arm (with the showerhead removed)
- Multiple fixtures are low and the main valve appears fully open
- You suspect a pressure regulator issue
- You see leaks, corrosion, or water damage
- Fixing it means removing trim and servicing a valve/cartridge behind the wall
For a clear visual of what “upstream” problems can look like
Shows how a clogged shower cartridge can reduce flow—useful for understanding what’s involved before deciding DIY vs plumber.
Quick checklist: The most reliable DIY path
- Compare other fixtures (one shower vs whole home)
- Remove showerhead and test flow at shower arm
- Clean mineral buildup using manufacturer-approved methods
- Clean the inlet screen(s)
- Check handheld hose and diverter function
- Consider a WaterSense-labeled upgrade if your pressure is naturally low
- If weak at the arm or whole home is affected, call a plumber
FAQs
Why is my shower pressure low but my bathroom sink is fine?
That usually means the problem is localized: mineral buildup in the showerhead, a clogged inlet screen, or a restricted handheld hose. Testing flow at the shower arm helps confirm it.
How do I know if mineral buildup is the cause?
Signs include uneven spray, jets shooting sideways, or visible crusty scale. A vinegar-and-water soak (when allowed for your finish) often restores performance.
Should I remove the flow restrictor to fix low pressure?
Usually no. Some manufacturers advise against it and warn about warranty implications, and showerheads fall under efficiency standards. Cleaning and troubleshooting first is the safer approach.
What if the shower arm flow is weak with the head removed?
That points to an upstream issue like a clogged cartridge, valve restriction, pressure regulator issue, supply problem, leak, or pipe restriction—often a plumber job.
Do WaterSense showerheads feel weaker?
Not necessarily. WaterSense showerheads are certified for performance as well as efficiency, and some models can feel stronger than older or partially clogged heads.
Can cleaning damage my showerhead finish?
Yes—if you use harsh cleaners or the wrong method for your finish. Follow manufacturer finish-care guidance to avoid damage.
Conclusion
A shower head low pressure fix is usually straightforward: isolate the problem by testing the shower arm, then clean the showerhead and inlet screen to remove mineral buildup and debris. If the shower arm itself has weak flow—or multiple fixtures are affected—stop chasing the showerhead and move to whole-home checks or call a plumber.
Sources / References
- US EPA — WaterSense Showerheads
- US EPA — WaterSense Specification for Showerheads Supporting Statement (PDF)
- Federal Register — Energy Conservation Program: Definition of Showerhead
- Delta Support — Can I remove water restrictors in shower heads or aerators?
- Moen product page (example cleaning guidance)
- Moen — Faucet Finish Care and Cleaning
- Town of Harrisburg, NC — Low Water Pressure (PDF)